

Introducing the Drywise
This spring, my team and I had the pleasure to see the Drywise active filament dryer, from Thought3D, in use in person at RAPID TCT. I have to say, Thought3D, the longtime makers of the Magigoo line specialty filament adhesives, have outdone themselves.

The Drywise active filament dryer is the perfect add-on for getting the best results in printing nylon, TPU, and other hygroscopic materials. Thought3D is also continually adding new profiles to get the best results for each material. Its unique closed-loop system, advanced sensor technology, and intelligent drying algorithm have revolutionized the drying process. By maintaining optimal filament dryness at the time of printing, Drywise enhances printing precision, strength, and surface quality.
I'll be the first to admit that while nylon filament has an its uses (durability, flexibility and chemical resistance), it's never been my favorite material to print. Between adhesion issues and stringing, it always seemed like more trouble than it was worth.
Magigoo PA takes care of adhesion issues beautifully, but I was always still wary about nylon due to the stringing. I thought that was as good as things get with nylon. That day in May, I found out there was a better way. Printers running side by side with a spool of nylon running straight through the printer (the print on the left below), and another spool running through the Drywise (the print on the right) on the same printer, with drastically different results.

The print using the Drywise (left below) was cleaner, clearer, and all around better quality on the first try than the print done simultaneously with the same brand of of filament on the same printer without the Drywise. One of the benefits of the Drywise is that because it actively dries the filament just prior to printing (unlike putting a whole spool in other dry-boxes to bake), is that you won't be re-drying the same material and degrading your filament by repeatedly applying heat.

We received our first shipment of Drywise machines and we are excited to share our own firsthand print findings with you. The Drywise comes in both 1.75 and 2.85 versions to be compatible with a wide range of machines. The Drywise also has a preheater add-on for use with glass fiber, carbon fiber, and other abrasive materials.

Let's see what's in the box, and get to printing.
The box was extremely sturdy, and the machine seems to be well packed, with convenient handles on the outside of the box, and on the interior packaging to lift the Drywise out of the box.

The accessory box contains:
- 2x desiccant tubes
- 1x pendrive with the user manual on it (connects via USB, USB-C, or lightning)
- 1x filament sensor and pin
- 1x power cable
- 1x USB-C to USB cable
- 10x o-rings
- 1x port closing kit
- 2x G1/4 connectors and PTFE tubes
- 1x filament tip sharpener
- 1x pair of heat resistant gloves


Go ahead and peel off the blue protective filament from the Drywise and install your pendrive in your computer to open the user manual. You can also download the user manual online.

Next, we're going to remove the shipping screw. This screw helps hold the pump in place during shipping. It's good idea to keep it in case you ever need to ship it.

Next, we'll spin it around, and install the filament sensor. You'll need the filament sensor, metal pin, and thumbscrew.The filament sensor will press into place. Slide the pin down the holes on the right hand side to create a hinge. Then tighten the thumbscrew to hold it all together on the left side.

Next, you can screw in the G1/4 connectors and the bowden tubes. The G1/4 connectors will screw right into the filament in and output ports.


The desiccant container will pop right into place; you'll hear it click at each end as you insert it.

Last, we'll go ahead and put the rubber stopper in the hole on the side of the Drywise where you removed the thumb screw at the start of the unboxing.

While we've been setting up the Drywise, I applied Magigoo PA to the bed of our Ultimaker S5 and started a print in nylon transparent with a roll of just opened filament. For my test print, I downloaded the spool holder base from Drywise, and scaled it down until it was about a 2 hour print with .2 layer height default settings.
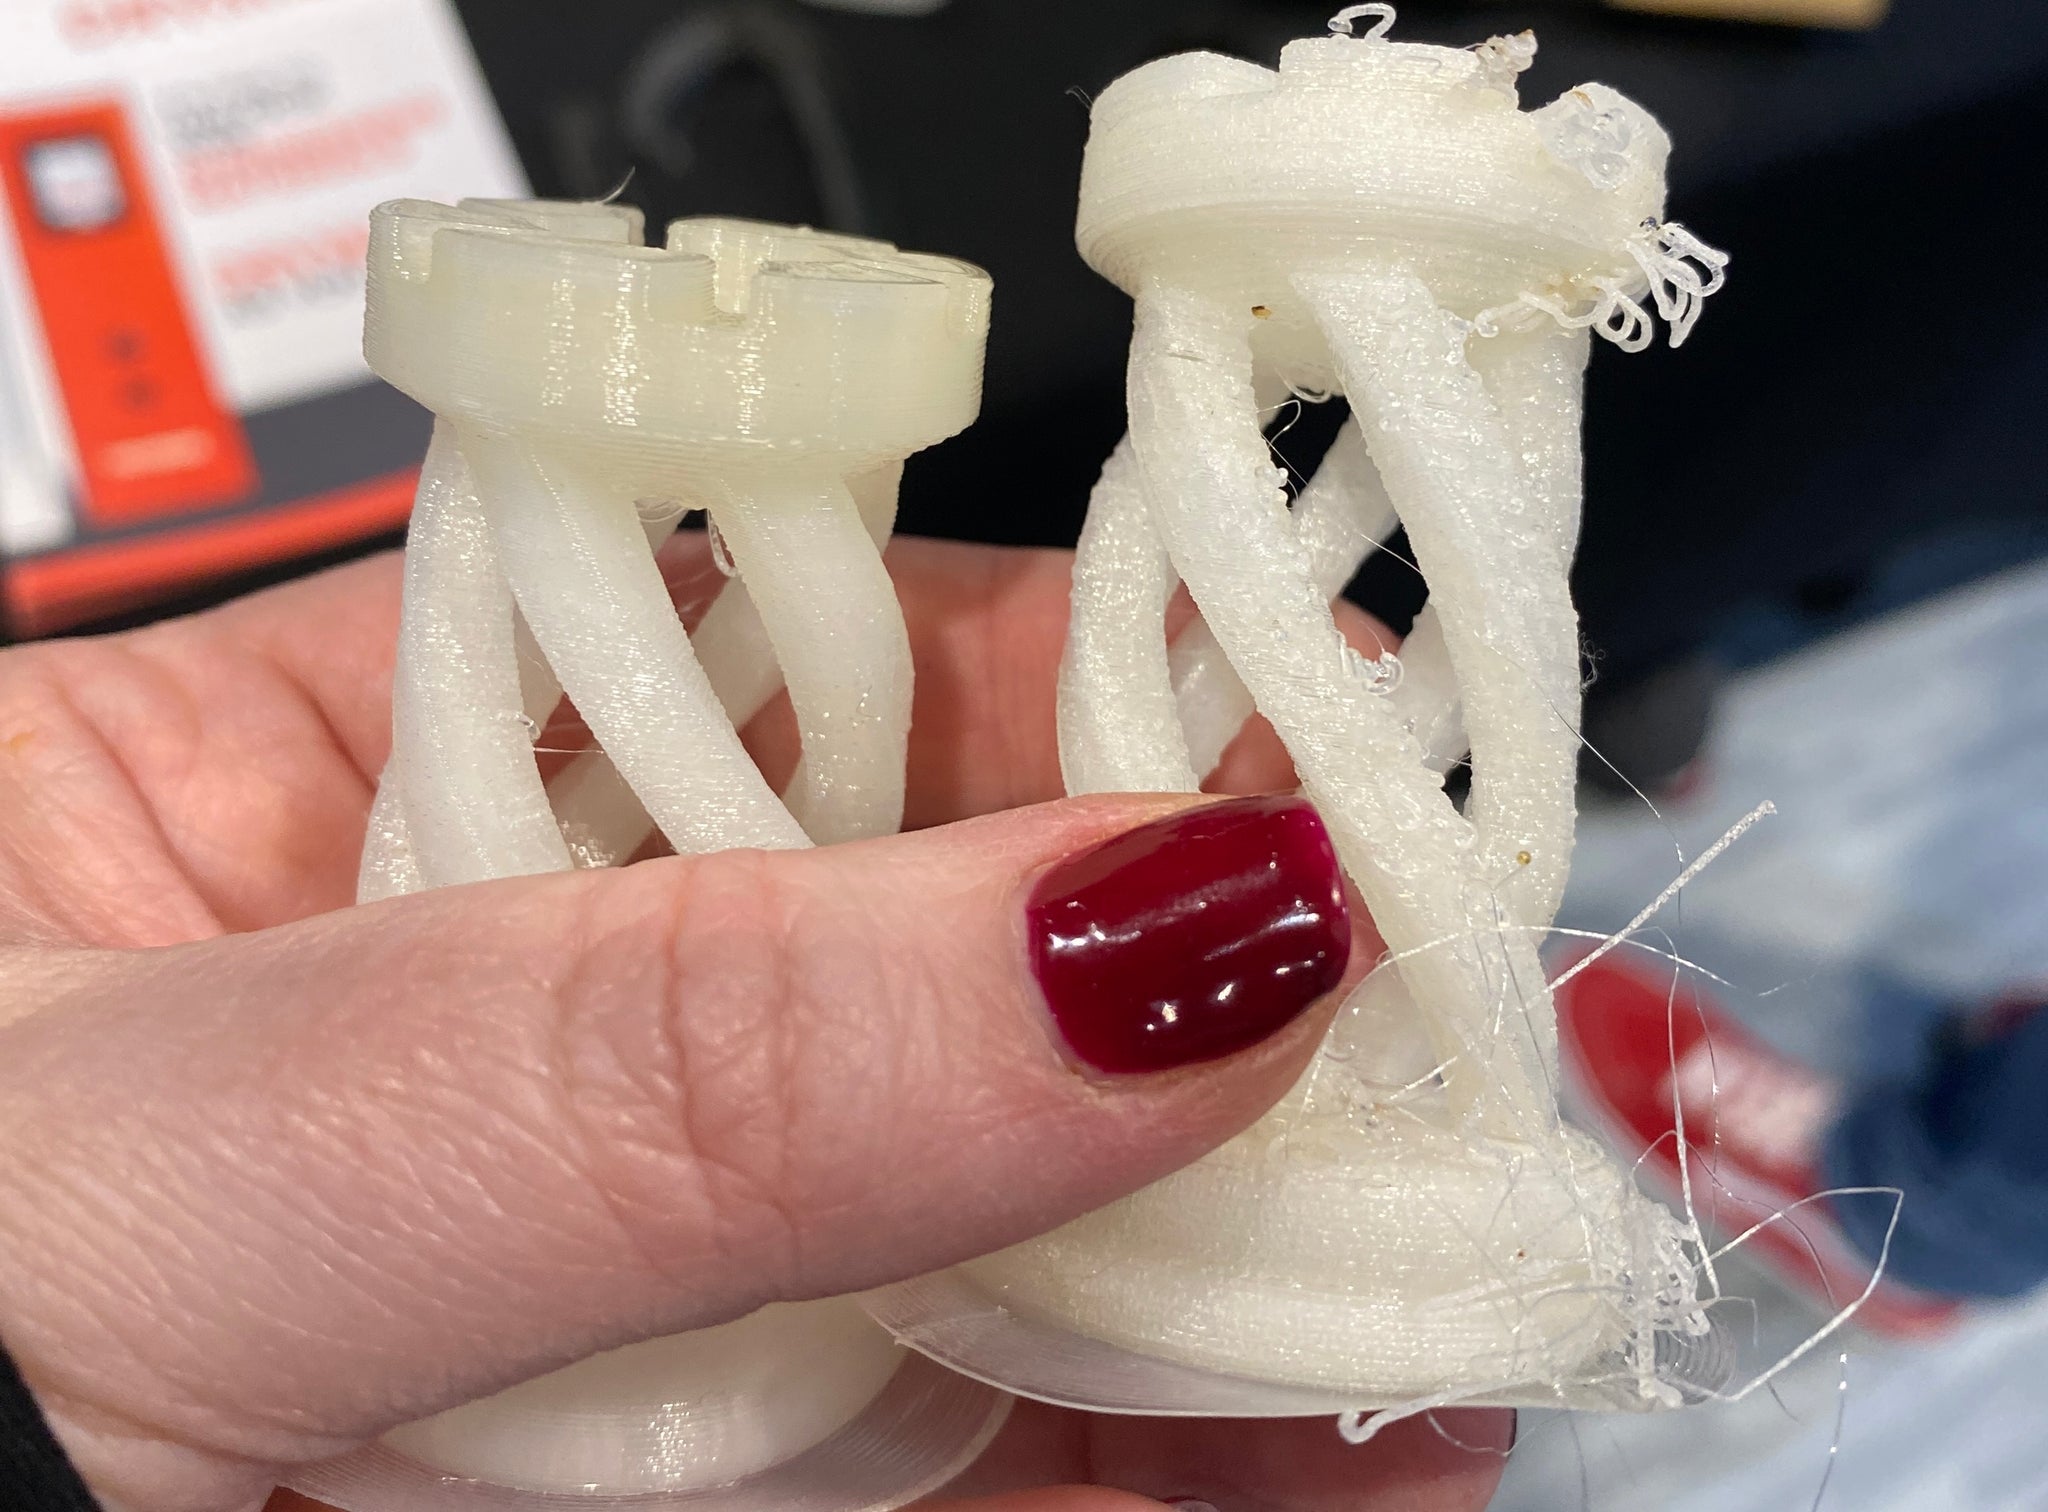
It's cloudy, stringy, and about what I've come to expect on as normal for nylon. I've designated this as Print A in all pictures going forward.


Now that the printer-only print is done, it's time to power up the Drywise and put it to the test.
After plugging the Drywise in and powering it up, the welcome screen took me through into a tutorial on how to load the filament.

I unloaded the the nylon from the S5, followed the onscreen instructions, and inserted it into the Drywise until the indicator light on the back of the machine was a steady green. A. couple notes:
- While I had originally installed the top bowden tube, I ended up removing it due to the angle of my filament on the back of the printer. You can alternatively mount a spool holder to the top of the Drywise.
- The Drywise comes with a sharpener to make sure you've got a good point on the filament so it doesn't snag in the feed path. Alternatively, you can use wire cutters to cut it to a point, which is my preference.
Back around the front of the screen I confirmed that I was ready to start drying, and let the Drywise get to work!
When the filament was done drying, the Drywise beeped to let me know it was ready for our next steps. I pushed the filament through the Drywise until the green indicator light turned solid, and loaded it into the printer.

The Drywise then entered another short prep phase to dry the additional material now inside the Drywise. The Drywise chirped again, and it was time to start the print.
Taking a peek at the print when it was about half way through, it was looking really good so far.

I waited for it to finish, and the rest of the print was just as good. There was a small bit of string up at the top, most likely related to part cooling on the narrow C shaped bit, but otherwise, it was extremely clean.

Setting Print A back on the print bed next to Print B, the difference was staggering. I came to the realization that I don't think any roll of nylon I've printed before has ever been properly dry out of the box. I'd generally attributed the short comings in print quality to extra friction on these bowden-fed machines with nylon being a softer material.
Both of these prints were run with the same UFP file, Print Core, feeder, and roll of filament on the same Ultimaker S5 printer. The only difference is that Print B printed through the Drywise.


To take the testing a step further, I unloaded the filament from the Drywise and S5, and cut off all of the dried portion of material to discard, and set the print to run again through just the S5.

The results for Print C were identical to Print A.


In addition to Print A and Print C without the Drywise being a lot stringier than Print B with the Drywise, the printed material was also much more translucent on Print B than on either of the other two prints.


At this point, I wouldn't print nylon without the Drywise, and I'm looking forward to testing out the drying profiles for TPU and PET.
Leave a comment
Comments will be approved before showing up.
Also in News

Bambu Lab H2S Combo, First Impressions
We're excited to have added the new H2S Combo from Bambu Lab to our showroom in Memphis. It's keeping our P1S Combo company while they both churn out prints for us. It's a quick and easy set up to get started.

New Location, Just Off I-40
After 11 years serving the Mid-South from our location in Bartlett, TN, fbrc8 is excited to announce we moved of a new space in Memphis, just off Whitten and I-40.

Bambu Lab Machines From fbrc8
fbrc8 is pleased to announce that we have recently partnered with Bambu Lab, to offer their printers, filaments, and spare parts. The Bambu Lab printers offer a plug-and-play printer experience at home at an affordable price.